
JEB’s GvFC Aztec Pen
Background
If you didn’t read the main page for the GvFC pens, here’s a recap…
As a custom pen maker, I’m called on to make a variety of pen styles, so I have to be on the ready. One way I try to hone my pen making skills is to challenge myself with a uniquely styled pen. I like to find a pen with a unique style, then try to replicate it.
This summer I ended up making THREE pens, all from a company called Graf von Faber-Castell (GvFC). The pens are from a collection they call their Pen of the Year series. This pen, called The AZTEC was the first of this years skills challenge.
Let’s begin…
This pen actually started from my desire to make a pen with a ‘relief’ style engraving pattern. And oddly enough, this pen popped up during an online search for skull images. And since the skull engraving on the barrel was also a relief, I decided to make my relief pattern the same way.
Creating the engraving
And so I began by making a barrel that I could apply the engraving onto. Next, I had to create the pattern. Since the pattern consisted of a repetitive image, it was fairly easy to create. But like all pen engravings, the key to a nice looking engraving is to scale the image/pattern correctly. Since I was replicating the pattern from another pen, all I had to do was use the same number of skulls along the length and around the circumference. Then fiddle with the size of the skulls vs the spacing.
Engraving the barrel
Whenever I’m creating a new pattern, before I attempt to engrave the pen, I always run a number of tests pieces. And that’s for a number of reasons. First is to make sure the image in the pattern is recognizable. When creating a pattern for something as small as a pen, you want it to be fairly easy to recognize at first glance (or at least the second). It might look just fine in the layout file, but once applied, the engraving can look quite different. So it took a few attempt to get the proportions adjusted.
Once I was satisfied with the size and shape of the skulls, I had to work on the engraving depth. Since this was a RELIEF engraving, only the area around the skulls, referred to as the ‘field’ would be removed. But you want to pay attention to the depth of the field. Too shallow, and it will just look like a normal engraving. Too deep and the field could start to look too rough (because the laser beam will begin to get too out of focus to burn correctly). Eventually I got an engraving I was pleased with.
What to do next (maybe a Section)?
Since I was only interested in the relief engraving itself, I hadn’t planned on making the rest of the pen. But I thought the barrel looked so nice, maybe it deserved to have the rest of the Aztec’s parts. The Aztec pens Section has an ink-view window, which will require using two different materials. Because the Section are small, using multiple materials on a Section can be a challenge on it’s own. So I decided to make the same style Section to go with the barrel.
But first, I had to make a decision about the material. The Section for the original pen was made with Anthracite (a hard coal). I’ve used lava rock before, so I thought Anthracite might not be much different. But I wasn’t able to find any. So I decided to go with something different. Thinking ahead, I also knew I wouldn’t be able to use turquoise for the emblems, so I needed to choose a different color for those. Eventually I decided to go with a yellow and black acrylic called Silver Banana Split for the Section, and a transparent yellow for the ink view window. Then to stay with the same yellow and black color scheme, I’ll use yellow acrylic for the emblems.
Now comes the hard part…
Now it’s time to make the cap. And although it might look fairly simple, this is where the real challenge was coming. It not only has grooves, but after studying them carefully I noticed they curve along with the taper at the top. So I couldn’t just make a straight cut across the cap.
I knew I had to cut the grooves with a router, but how? After giving it considerable thought, I decided the best way to cut them would be with a router platform setup on top of the lathe. That way I could use the lathe to secure the cap between centers to keep both ends steady.
The cap was mounted with the top facing the tailstock, so the router platform had to have a curve on the right side that matched the curve in the cap. It was a tricky setup, because the pattern also had to STOP at the front. So I had to have the platform setup to stop at the right spot at the base of the cap, then have the curve begin at the right spot at the top of the cap.
To cut or route the groove (pronounced root), I used a router bit with a 90 degree v-groove bit. I started out with a 60, but it wasn’t steep enough. I think 120 might have been better, but I couldn’t get one small enough. So I had to settle for the 90. But I think the grooves looks pretty close.
The cap has eight grooves around the circumference. To keep the spacing consistent, I used a feature on my lathe called an Indexing System. The lathe has a special circular plate or disk mounted on the spindle with a series of holes. then a pin in the side of the headstock is engaged in a specific series of hole to create the spacing needed. My lathe has three different hole patterns that allows me to create a variety of index positions. In this case I used the 48-hole index and starting with #1, set the pin on every 6th hole thereafter.
Button it up…
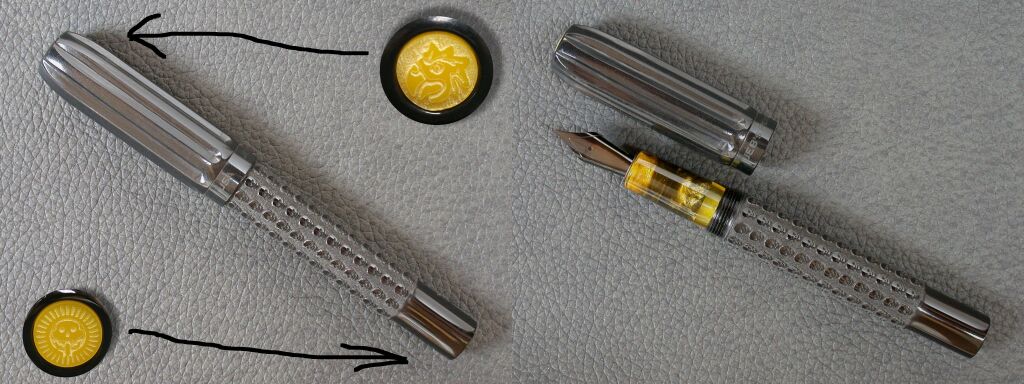
The last step was to make the buttons or emblems (some also refer to them as doohickeys). I applied a few engravings directly on the ends of pens, but not separate buttons. So this was new, both making and applying. The original buttons were made from turquoise. Unfortunately you can’t engrave blue acrylic with a diode laser, so I had to choose another color. I used yellow to coordinate with the yellow & black section.
The buttons are only about 10mm diameter, and are made from a larger sheet of 1/8″ 93mm) thick acrylic. Once the images are engraved, the laser cuts out the circles.
- Below are the dimensions for the Aztec fountain pen:
- Length:
>Capped: 5.37″ / 136.6mm
>Uncapped: 5.145″ / 130.6mm.
>Posted: 6.91″ / 175.5mm.
>Barrel only (less threads): 2.95″ / 74.9mm.
>Cap only: 2.43″ / 61.8mm.
>Section only: 1.0″ / 25.4mm. - Diameter:
>Cap max: .708″ / 18mm.
>Barrel max: .59″ / 15mm. - Weight (oz):
>Capped: 23.9
>Uncapped: 14.6.
>Cap only: 9.3. - Material:
>Barrel: Black acrylic acetate.
>Cap: Black ebonite.
>Section: Silver Banana Split Rhinoplastic.
> Ink view: Yellow transparent acrylic.
>End caps: Yellow sheet acrylic. - Hardware:
>Nib: Black PVD Coated #6 Jowo.
The second pen in my skills series is the GvFC Ancient Egypt.
")

")
")
")
")