
LotR Theme Fountain Pen
About this pen…
This LotR theme fountain pen is the latest in my Skills Challenge series. In my exploration into various laser engraving methods, the latest method I wanted to try on a pen was cutting. I’ve cut out a few flat non-pen parts, and even made wooden ornaments with cut out designs over Christmas holidays. But I wanted to try this technique on a pen. I’ve seen fountain pens with small cut outs just behind the barrel threads. The cut outs create a series of ink-view ‘windows’ around the barrel’s circumference allowing you to see the remaining ink level. I was curious and wanted to try the technique.
NOTE: Before I go on, I should mention that the details for this pen are a bit long. BUT the pen has so many features that I was able to recreate, I wanted to be sure and cover them all. A short explaination of the pen just wouldn’t do it justice. So I hope you’ll stay with me and read about the entire experience. But to make the page itself shorter, I used drop-down boxes to condense the sections. Clicking the heading will expand (or retract) each section.
Additional Note: I should also mention that this pen is NOT FOR SALE (sorry).
Getting (sort of) side-tracked…
While I was researching for window style ideas, I ran across a pen from Montegrappa called Ode to Bag End. These were Lord of the Rings (LotR) theme pens with large cut outs down the length of the barrel. After looking over the images, I decided I just had to try and make one. While they’re not the ink-view style windows I originally wanted to make, the technique for making them is the same.
Originally, I only intended on making the unique barrel. But like previous projects, because the pen had so many unique features, I decided to try making other parts once I got the barrel windows worked out.
About ‘Bag End’…
If you’re not familiar with the odd name given to this pen, I’m sure you’re not alone. You’d have to be a big Lord of the Rings fan to recognize it. ‘Bag End‘ is the name of the home of Bilbo Baggins and cousin Froto, hobbit characters in the LotR series.
While I was familiar with the houses name from the series, I didn’t know why it had the odd name. So I thought I’d research it to help us all understand where it came from. I was surprised to find out that ‘Bag End’ is named after the real-life farmhouse of the LotR author J.R.R. Tolkien’s aunt!
The fictional Bag End home is built into the side of a hill at the end of a dead end lane in the village of Hobbiton. Interestingly, Google also says “the name (bag end) also functions as a pun on the French phrase “cul-de-sac”“, which we all know is also a dead end street). The fictional house features a large round wooden entrance door, which brings us to the next feature of the Bag End pen–the Finial. The finial is a miniature replica of that round wooden entrance door. It has some unique details that I also wanted to try and recreate with my laser engraver. And it too would offer a challenging learning experience in the process.
Making the Barrel…
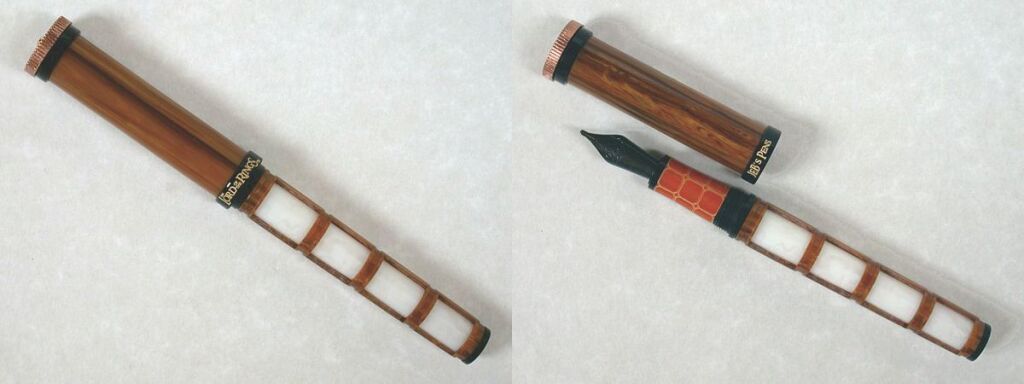
The barrel is made up of what I call inner and outer barrels. The white piece you see between the cut-outs is the inner barrel. It’s a single piece that fits inside the outer barrel before the short black piece containing the threads is attached.
Before making the barrels, I had a bit of ‘chicken or egg’ discussion with myself as to which one I should make first. I eventually decided I should make the outer barrel first. But the inner barrel preparations had to begin with the outer barrel.
Outer Barrel…
The outer barrel is made up of three pieces: the main barrel piece, then the two short black pieces at either end. The inner barrel is actually one long piece. But both were challenging because they are tapered. I can’t drill tapered holes, so I had to drill a series of stepped holes inside the outer barrel for fitting the inner barrel. Since there are four windows, I drilled 4 different size holes.
Starting with the largest hole at the front, each successive hole was slightly smaller than the previous one to mimic a taper. And to make sure the start and stop transitions didn’t show within the windows, I didn’t want the stop and start holes to show between the windows, so I had to plan the depth of each hole so they fell between the windows. What makes this challenging is that the windows aren’t cut yet!
Preplanning is crucial…
Whenever I make a new style pen. I always make a detailed layout showing exact dimensions of all the parts both inside and out. This layout was crucial for laying out the stepped holes in the outer barrel. I simply transferred the dimensions from the layout to each drill bit. Once the holes were drilled, I could finish shaping the outer barrel.
Shaping the inner barrel…
Once the outer barrel was completed, I could now make the inner barrel. But now I had to give the inner barrel the same ‘stepped’ shape on the outside as the holes I drilled inside the inner barrel. Because the outer barrel has the separate piece at the front for the threads, I could drill a single size hole in the inner barrel. This was important for orientation! If I had to drill stepped holes in the inner barrel with larger holes at the front, it would be facing the wrong direction.
Since I only needed a single size hole, I was able to drill a through hole (one that goes all the way through end to end), then make the end facing out (toward the tailstock) the smallest end. That way I could stop and check the diameters with the outer barrel as I went along.
As I shaped the inner barrel I had to turn each one to the correct diameter, as well as make sure the step transitions matched up with those in the outer barrel. It was a bit of a challenge, but with a little patience, I was able to get a nice tight fit.
Making the Barrel Windows…
As mentioned briefly earlier, the barrel has rows of windows cut along the length, exposing an inner barrel. Because the barrel is small and hollow, I thought the challenge with engraving the windows would be keeping the laser from burning into or through the opposite side of the barrel once it cut through the surface. After some testing, I also realized the barrel needed to be open at one end in order to allow heat and fumes to escape. The material was polyester acrylic, and it created a lot more smoke and soot than the acrylic acetate that I’m usually engraving.
The solution to protecting the opposite side inside the barrel was to use a loose fitting plug made of blue acrylic. The color of the plug was important because a blue diode laser won’t cut most things blue. Instead the blue material will absorb the blue laser beam. While the plug didn’t escape unscathed, it did its job quite well. The polyester acrylic created a lot of black soot. But once cleaned off with a little acetone, the cut edges were pretty clean. I only needed to make a few passes with some fine sandpaper.
Making the Door…
I created the door by first roughing out the overall shape on the lathe. Then I did the fine detailing with the diode engraver. Because it had so much detail, I created several engraving layers. One for the board slats and grooves; another for the various degrees of pitting; and then the perimeter detail. The perimeter detail mimics the brick molding around the round door, and the grooves represent mortar.
Because the mortar detailing had to wrap around the edge, I had to figure out how to do that. I couldn’t run the edge in a separate pass. It would be near impossible to line up the narrow grooves with the face. So instead, I used the top engraving lines and ran the laser over the edge. It took about 40 passes with the engraver to run the groove all the way down the side. But it worked. The last step was the coloring with some Testor’s enamel modeling paint. Then I topped it off with a tiny solid brass door knob in the center to match the original.
Material…
The primary material I used for the cap and barrel is a polyester acrylic called ‘Briar‘. It has a similar color and wood grain pattern that comes pretty close to the original pen’s finish. After studying the images of the original pens closely, I think the parts were made from a solid color acrylic. Then the wood grain pattern was applied to the surface with a dipping process later. I could be wrong. But I noticed areas in some of the photo’s where the pattern appears to have been touch up by hand. A tell-tale sign of a dipped finish.
Section…
Another unique feature of the Ode to Bag End pen is the Section. The material color and engraving pattern mimic the terracotta tile shown on the floors in the Bag End home. While the Section may be small, like the Section on other theme pens, it’s definitely a stand-out feature. I was fortunate to be able to find a material color that match pretty close. The engraving pattern on my Section is like the original, but the color is different. On the original, it’s more of an impression into the material. But since it’s suppose to mimic tile grout, I think the white on mine actually looks more realistic.
Other Engravings…
There are a few other engraving details on the pen. First is the band at the base of the cap. It’s engraved with the LotR logo on one side; and JEB’s Pens on the other side (instead of Monegrappa). Both are inscribed in the original LotR RingBearer font and filled with a special gold engraving filler paint called colorfill. There’s also a small engraving on the end of the barrel. The original pen featured the Monegrappa logo graphic. But on mine, I gave a nod to Bilbo by using his initials. I debated whether to fill these with gold too, but decided to keep them unfinished like the original.
My own little surprise…
When possible, I like to add a little unexpected surprise to my pens. One final surprise I added to this one was with the material I used for the inner barrel. I had some material that I thought was very close in color to the original off-white on the original pens. But instead I decided to add my own little surprise with a piece of Photocromatic acrylic. Photocromatic acrylic changes color when its flooded with sunlight. So in regular light the inner barrel looks off white. But sit it in sunlight for a while and it begins to turn dark pink to purple!
Cap clip & upper band…
If you’ve seen the original Bag End pen before, then one glaring omission you’re sure to notice on my version is the missing clip and lintel band under the finial. Instead of these, I made my pen clipless and used a plain narrow band under the finial. I’m thinking both of these parts might be perfect projects for a 3D printer, something I’m considering as my next investment. So looking ahead, I decided to mount the finial with a drop of hot melt glue so it was easy to remove. In the meantime, I’m in the process of learning to design 3D objects.
Dimensions…
Below are the dimensions of the LothR Ode to Bag End pen:
- Length:
>Capped: 5.72″ / 145.5mm.
>Uncapped:
>Fountain pen: 5.11″ / 129.8mm.
>Rollerball pen: 5.01″ / 127.2mm.
>Posted: Does not post.
>Barrel only (less threads) : 3.11″ / 79.0mm.
>Cap only: 2.61″ / 66.3mm.
>Section only: .835″ / 21.2mm.
>Rollerball Nose-cone: .72″ / 18.2mm. - Diameter:
>Cap >main: .59″ / 15mm.
>bands: .67″ / 17mm.
>finial: .70″ / 18mm.
>Barrel >max: .55″ / 14.1mm.
>min: .46″ / 11.7mm.
>Section >max: .47″ /12mm.
>min: .43″ / 11mm. - Weight (gms):
>Capped: 16.0
>Uncapped: 8.1.
>Cap only: 8.0. - Material:
>Cap & Outer Barrel: Briar polyester acrylic.
> Inner Barrel: Grapefruit Photocromatic acrylic.
>Section: Kirinite Mango Cream acrylic.
>Cap Bands; Barrel threads & End-cap: Pure black acrylic acetate.
>Finial Door Knob: Solid brass.
>Finial Paint: Testors model acrylic.
NOTE: The uncapped length shown is for the fountain pen. The rollerball pen is only .10″ / 2.54mm shorter at 5.01″ / 127.25mm. The nose-cone and refill tip length on the rollerball basically replaces the length fountain pen nib.
Final notes…
Montegrappa made three versions of the Ode to Bag End pen: fountain, rollerball and ballpoint. The fountain and rollerball pens are similar in style with removable caps. Only the Sections are slightly different. The rollerball uses the same section, but with a tapered nose-cone added to it to instead of the nib (rollerball photo’s included below). The ballpoint version however is a 1-piece twist design that’s typically found in ballpoints: twist the cap to extend/retract the tip.
This pen was fun to make, but VERY challenging–I think my most challenging pen yet. But that’s the reason for the skills challenge exercises. To learn new methods and challenge myself.
PS… If you have an idea for a THEME pen, I’d like to hear about it!
")
")
")
")
")
")
")
")
")
")
")
")
")
")
")
Miscellaneous items:
I also offer a variety of hand-made pen-related items. Pen Props, pen cap Buttons, Pen and Ink Trays, Cufflinks, and Button Covers. Use a Pen Props to display a pen or temporarily raise the nib. Order in a pen-matching material or a wooden style in a variety of finishes. Cap Buttons are small pieces of cap jewelry you can add to a clipless pen to keep it from rolling. Use a Pen & Ink Trays to display your favorite pen and ink. Trays are available in several styles and in your choice of natural wood. Cufflinks and Button Covers are timeless favorites that dress up a shirt. Order them in pen-matching material.

To custom order any of the pens you see on my website for yourself or as a gift, please contact me at jeb<@>jebspens.com.
If you need fountain pen maintenance help (cleaning, refilling, or general issues), please visit my “Fountain Pen Help Line” page. If you’re having a problem and can’t find a solution, use the contact form or send an email.
For pricing, shipping, and warranty information, click the CONTACT link in the footer menu.