
- Fountain Pens
Full Size - Fountain Pens
Midi Size - Fountain Pens
Mini / Pocket - Fountain Pens
w-Metal Bands - Fountain Pens
w-Acrylic Bands - Other
Pens/Pcls - Desk
Pens - Other
Items - Contact
& Info
...---... ...---... Fountain Pen HELP LINE ...---... ...---...
Congratulations on purchasing your new Fountain Pen!
Please note: For continuity, this page now contains all the combined information on cleaning and filling maintenance for any type of fountain pen. If you find any incorrect information, or would like to have me include any additional information, please let me know.
Here you will find instructions for "re-inking" your fountain pen, as well as some maintenance procedures to perform on your pen. From filling or re-inking your converter, to cleaning the converter and/or button/piston filler pen so it performs to your satisfaction.
There are basically two types of ink reservoirs used in a fountain pen: an international disposable ink cartridge, and a refillable converter (also referred to as a "piston ink pump" or "piston reservoir"). See below for more details on the types of refillable converters.
Please note: The cartridge and refillable converter are considered "standard" inking systems (referred to in short as a "C/C" pen), but there are some pen manufacturers that do make and use their own proprietary cartridges and/or pumps, but they only fit THEIR pens. All of the custom and kit fountain pens available on this website are C/C pens, and will accept either of the standard disposable cartridge, or the refillable converter.
The ink in the disposable cartridge and most bottled ink you will find for the piston pump are water-based inks. Therefore they can be easily cleaned with water (but please take note that the ink will STILL STAIN your hands and clothes. So you still need to be careful). Except for refilling the converter with ink, the installation of these two parts (into the pen) are virtually the same process.
Most serious pen owners or those who use their pen(s) often, prefer to use the ink converter, but the cartridge is definitely more convenient. You should be able to find the refill cartridges or bottled ink at your local office supply store or online sites devoted to pens. If you have access to a small syringe, those can also be used for refilling either the converter, or the disposable cartridge.
| Disposable Cartridges... these are convenient and easy. As the name implies, as a cartridge empties, you simply swap it out for a new one. Cartridges all LOOK the same, but there are different sizes. The "standard" cartridges are officially referred to as "International Standard Cartridges". And there are TWO sizes: the common 38mm SHORT cartridge, and the 73mm DOUBLE cartridge. Examples of the cartridges are shown on the right. In a standard size C/C pen, you can usually fit TWO of the SHORT cartridges--one in use, and another as a spare. | 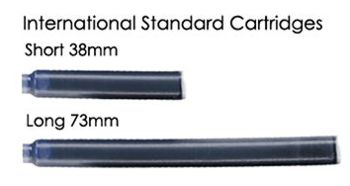 |
| Refillable Converters (Pumps)... These are usually more for those that like to use a certain brand or color of ink that may not be available in a cartridge. The pumps come in a variety of styles, but they're all basically the same. They use an internal PISTON to pull the ink up into the reservior. On some pen brands the pump may be fixed to the pen and cannot be removed. The removable versions (as shown on the right) are installed just like a cartridge. Removable pumps can be filled by themselves (removed from the pen, or while still installed. The removable versions can typically be used interchangeably with the replaceable cartridge. | 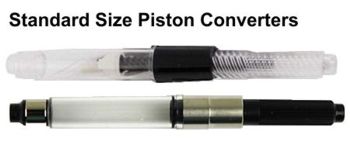 |
| Refillable MINI Piston Converters... These mini piston converters are basically the same as the standard size converters. The only difference is they're shorter and hold a smaller amount of ink. While the name implies they may be used in smaller size pens, the mini piston converters aren't much shorter once they're filled because the plunger stick out at the top making it twice the length once filled. | 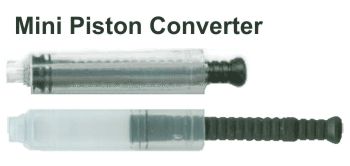 |
| Refillable Squeeze Converters... The SQUEEZE converter is another style of refillable converter. Instead of using a PISTON, they use a BULB. The style works much the same way as an internal bulb or lever filler pen. The most common is the bulb and lever style (the two on the lower right), while there are also a few that use just a bulb like the mini Kaweco shown at the top right. | 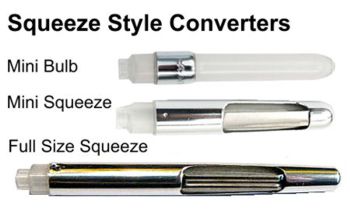 |
The converters shown above are all add-on converters. Meaning they're a separate part that can be used in place of a disposable cartridge. These systems make up the majority of fountain pen styles sold these days, but due to increasing popularity of the fountain pen, the internal inking systems outlined below are making a resurgence and several pen makers have introduced more of those internal inking systems over the last decade.
Similar to the external inking systems shown above, there are several styles of internal inking systems as well, and can be placed into one of three categories: Bulb, Piston, and Plunger. The BULB systems can be comprised of just the bulb (like the mini bulb above), or in a lever or button filler. Both the lever and button filler pens use an internal bulb, and a lever just like the squeeze converters. The only difference is what makes the pressure bar move. On the Lever filler, it's pop-up lever that presses down on the pressure bar and compresses the bulb to expel the air so it then takes up ink. But the Piston uses a similar internal system as the Piston converters. The PLUNGER system works very similar to the Piston. These can be recognize by the little pump handle that's recessed into the end of the barrel under the blind cap. Some of these will also incorporate a "viewable" ink window that will allow you to visually monitor the level of ink from the outside.
If you have any further questions on this subject, please
do not hesitate to contact me.
Replacing Cartridges and/or Filling a Converter:
Please note: Whether you are filling a converter pump or replacing a disposable cartridge, the process is basically the same. If you're filling a pen that has an internal filling system (and doesn't come apart), the procedure is similar, but requires a few additional steps and precautions. See the note for those at the bottom of the page.
Step 1. First, remove and set the cap aside.
Step 2. Next, grasp the pen barrel with one hand, then the section (the part piece above the nib), and rotate the parts counter-clockwise until the parts become separated. You should now have the barrel in one hand, and the nib, section and cartridge or converter in the other.
Step 3. The next step depends on whether you're using a disposable cartridge, or a converter pump (also called a reservoir):
a. Disposable Cartridge: If your pen was shipped with an standard disposable cartridge and you're going to replace it with a new one, simply pull off the old one, then press the new cartridge onto the feeder nipple located inside the nib assembly. If you look into the back end of the section, you will see a round black "tenon" recessed inside. The narrow end of the cartridge needs to be pressed securely onto the tenon so it seats securely. The end of the cartridge that will seat onto the tenon is sealed, and will take a little pressure to seat fully.
b. Refillable Converter Pump: If your pen was shipped with or you want to replace the disposable cartridge with a refillable converter pump, you will need to have a bottle of ink on hand to fill / refill the pump. To refill the pump, first make sure the piston or o-ring inside the pump is moved all the way to the BOTTOM. If it's not, twist the top knob at the top counter-clockwise to move it to the bottom. Then to fill it with ink, simply insert the pump partway into the ink bottle, and turn the knob clockwise this time to PULL the ink up into the reservoir. Continue twisting the knob until the converter is full. Once full, pull it out of the ink and wipe the excess from the outside.
NOTE: Filling a converter pump can be
a messy endeavor. So if you've not done it before, or don't want the ink to stain your fingers, be sure to wear latex gloves, and do the filling over
something you don’t mind throwing away afterwards. Also make sure to have a few
tissues or paper towels on hand to help with the clean up.
Step 4. CHARGE THE NIB. Before reassembling the pen, you need to "charge" the nib. Basically what you are doing here is making sure the ink is starting to flow down the feed and to the nib. If you're using a disposable cartridge, just squeeze the cartridge to push some ink into the feed to get the ink flow started. If using a converter pump, twist the top knob counter clockwise slightly to push ink down into the feed.
CAUTION: Sometimes it takes a while for the ink to flow, so don't hurry the process by trying to squeeze too much ink into the feed. Once you've started it (by squeezing the cartridge or twisting the converter knob) set the pen aside (uncapped) for a few minutes. Then come back later and try writing with the pen. If it still doesn't want to come out, see the "Additional Steps" below.
Step 5. After charging the nib and the ink is flowing, reattach the section (with the cartridge or converter pump installed) back into the main body or barrel of the pen.
Additional steps... If the ink doesn't seem to want to flow, then try these additional steps:
1. Sometimes I find you can help the process along by softly wiping or dabbing the top of the nib with a tissue or paper towel to check if it's getting any ink at all. If it has a little ink on it, the ink is starting to flow, so just give it a little more time. If not, then go to the next step.
2. Dip the pen nib point into some room temperature water to help prime the feed mechanism. You will know the feeder mechanism is primed when colored ink appears in the water.
3. If you installed a disposable cartridge, you will need to make sure when you pressed it onto the tenon, the tenon penetrated the plastic and the ink will flow. After you go through steps 5 & 6, if the pen doesn't write, you may need to remove the cartridge to check that the seal in the tenon broke through.
4. You may need to check the alignment of the nib to the feed. This requires a very good eye, or better yet (especially for us old guys) a magnifying glass or "lope". The goal here is to look into the tiny circle at the bottom of the slit on the nib to see if the feed groove is lined up vertically with the slit in the nib. If you don't see a line through the hole, then the feed is not lined up. Twist the nib slightly to one side or the other (you can look at it from the underside (feed side) to help tell which way you need to twist it). Once they are lined up, the ink should start to flow again.
Filling or Refilling a pen with a built-in filling system (bulb, button, piston, lever)...
Fountain pens with internal filling systems (bulb, lever, or piston), take a little different approach, but is somewhat the same as filling a converter. But here instead of taking the pen apart, you're dipping the nib and part of the section into the ink (bottle).
How deep... I often get inquires from people that say they have trouble filling their pens. Usually it's because they aren't dipping their pens deep enough into the ink. You MUST dip the lower end of the SECTION into the ink in order for it to create suction. If you don't the feed will continue to suck air, instead of ink. There's no way around it.
How long... Once you start filling the pen, continue pumping (bulb), pushing (button) or turning (piston), or flipping (lever) as long as you're seeing air bubbles coming up in the ink. Once the bubbles stop, the internal reservoir is full.
Clean up... Once filled, you want to wipe the section and nib to remove any excess ink.
ALTERNATE FILLING METHOD WITH A SYRINGE... A neat trick I learned quite a few years ago for easily filling a converter or a disposable cartridge, was to use a small syringe. Several places online sell inexpensive 5mm syringes online dirt cheap. You can buy them with sharp tapered tips or BLUNT tips. Blunt tips is preferred, but if you can't find those, but have access to a grinder or sandpaper, just blunt the tip your self.
If you have any further questions on this subject, please
do not hesitate to contact me.
Draining and Cleaning:
Draining and Cleaning your inking system... No matter what type of inking system you use, you should drain the ink on a pen with an internal system, or pull the cartridge or converter, and thoroughly clean it once a year. Once the ink is drained, flush the nib & feed with warm water (never use cold or hot water to flush). Use a large plastic bucket to avoid getting ink stains in the sink, and wear plastic or latex gloves to protect your hands. Otherwise be prepared with some ink remover to get the ink off your hands because it's a bit of a messy but very necessary process.
Dry or Clogged Pen... If you only use the pen once in a while, because the ink is water based, the pen can be phoned to clogging. If you find yourself in this situation, try the following: 1) Grab a tissue, paper towel, or cotton cloth and make it fairly wet, but not so wet the water runs out when it's squeezed; 2) Wrap the wet item around the nib, then set it aside for a few minutes. If it's not too clogged, that might do the trick; 3) If #2 didn't work, go up and try the "Draining and Cleaning" steps again. Once it's cleaned, install new ink based on the type of inking system you have.
If you use disposable cartridges in your fountain pen, the once you clean the nib assembly, you're finished. Just install a new cartridge and you're ready to go again. However, if you have a pen with an internal inking system (Button, Lever, or plunger systems), or a removable converter, then there are a few more steps to go before you're finished:
Cleaning a Pen with an INTERNAL filling system... Whether you have a Button-filler, Lever-filler, or some type of internal plunger system, the inside of the pen needs to be thoroughly cleaned as well. Button & Lever fillers have the same internal parts. They have an INK SAC that stores the ink, and a pressure bar that pushes down on an ink sac when the button is pushed, or the lever is lifted. But all that needs cleaned is the inside of the ink sac, and that is basically done the same way you fill it with ink-- you just use water instead. But you have to fill, then flush, then fill/flush again, repeating the process until only clean water is being push out. Once you have clean water, empty the pen of water as well as possible, then fill with ink. To avoid getting ANY water that may remain in the ink sac out of your ink, I like to turn my pen upright, nib down with the nib wrapped with a paper towel. The contact of the nib to the paper towel will pull a little more of the water from the sac and nib assembly.
Cleaning a Piston or Plunger system... The internal parts of piston and plunger systems are a little different, but they way they work is the same--which is exactly the same as a removable converter. They have an internal gasket that seals and separates the ink from the rest of the system. They have a knob that is turned to move the gasket up and down, pulling in or pushing out the ink. So if you have one of these systems, you use the same cleaning technique as you would a standard converter (below). The only other difference would be with a PLUNGER system. Depending on the style you have, the plunger shaft may need lubricating. Check the instructions that came with your pen, or contact the manufacturer to find out.
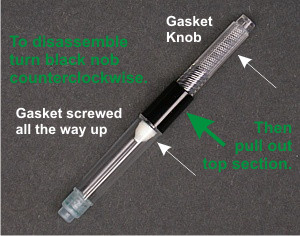
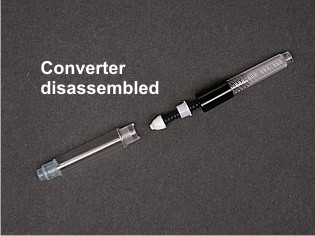
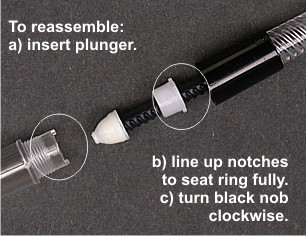
Cleaning a Converter... But if you use a converter, then the converter should be clean as well to avoid dried and/or old ink build-up. Although there are several different styles of converters, they all work the same way: the have a knob that turns a screw shaft that pushes & pulls a gasket. The gasket is self sealing on the inside so the ink stays in the bottom of the converter. Below are a few photo's of a typical converter: Photo-1 (from left) shows an assembled converter with the various parts labeled; Photo-2 shows disassembled converter; Photo-3 shows a close up, with instructions for reassembling the converter.
 |
 |
 |
If you have any further questions on this subject, please
do not hesitate to contact me.

